Final Pressbook Edits
Theresa Huff
Before your chapter can be considered ready to publish, there are a few last revisions to attend to. Read through each of the steps below and make the required revisions and edits to your chapter.
Step 1 Make Your Improvements
Reading and interacting with all of your peers’ chapters in the last five weeks likely has sparked ideas of things you would like to add or remove from your chapter. You don’t have time to redo the whole thing, so don’t go crazy, but do pick a few things to improve and improve them.
Note: if you add images, infographics, or charts, they must have alt text and captions. If they are complex images, infographics, or charts, they must have image descriptions.
Something to consider
Reflect a minute on the experience of reading your peers’ chapters. What aspects made you feel more motivated to keep reading? What aspects held your attention? Consider these possible ways of revising your own chapter to improve your readers’ motivation and attention:
- Consider reducing the length of content in your chapter (without removing the key information required in the original outline).
- If you have more than one H5P interactive, you might consider moving them closer to the area of the chapter where that content was covered to offer your reader breaks in the reading.
- Revise your text to sound more conversational and more like your own voice.
Step 2: Fix your Reference list
I have some bad news for you: When you paste in text to Pressbooks, the italics are automatically removed. This means that, for many of you, the italics in your reference lists are no longer following current APA format. Go back through your references, add italics where needed, and double check them one more time for APA compliance.
Note: you do not need to reference YouTube videos since they are embedded, but you can if you wish.
Step 3: Fix your Image Descriptions
If you have used image descriptions in your chapter, they should be italicized.
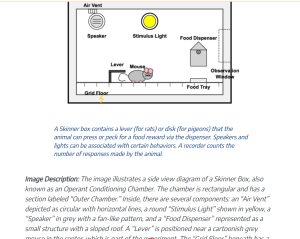
Example:
Step 4: Fix Attribution Statement
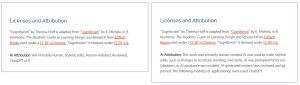
You all included an attribution statement for your OER that shows how you reused or remixed OER in your chapter. However, not all of your OER attribution statements include links to the original OERs you used/remixed and the chosen licenses. Review your OER Attribution Statement and include these links.
Example:

Note
if you feel your Attribution Statement is to unwieldy or long, you can set it up like David (and few others) did in their chapter:

Step 5: Add AI Attributions
We used AI for several things in these chapters, and we want to be transparent about that use. If you haven’t already, include an attribution statement about your use of AI in the chapter. Use this AI Attribution builder to make this easy. Place this under the OER Attribution Statement in your Licenses and Attributions textbox at the end of your chapter.
Example:
Step 6: Copyedit
The current recommendation is for textbooks (even at the graduate level) to be written at a ninth-grade reading level (Flesch, 2020). Reread your chapter one last time to ensure
- There are no grammatical errors, and
- That it would be clear for even a 9th grader to understand. If not, change the wording to make it so.
Step 7: Add Explanatory Feedback in H5Ps
Instruction is information with opportunities to practice and receive feedback. The H5Ps each of you have built in your chapter provide your learners with formative assessments (practice) of your learning objectives. All of the H5P automatically include “correct” or “incorrect” responses to practice, however they should also have built-in, explanatory feedback in them.
Explanatory feedback offer corrective guidance while the learner is practicing.
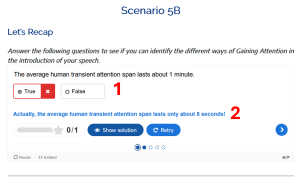
Example:
You can write your own explanatory feedback, or you can co-create the explanatory feedback with your AI tool. Just remember you must always check it for accuracy!
To add your explanatory feedback to your H5P,
-
-
-
- Make the changes in Lumi to your H5P.
- Save and upload the new version of your H5P to our Pressbook.
- Place the H5P in your chapter.
-
-
Step 8: Save your chapter
References
Flesch, R. (2020) “How to Write Plain English”. University of Canterbury. https://web.archive.org/web/20160712094308/http://www.mang.canterbury.ac.nz/writing_guide/writing/flesch.shtml
Licenses and Attribution
